Study group call on Google Meet: record it and share the notes
Record a study group call on Google Meet in Chrome, split the transcript by topic, and share clear notes with the group instead of a long recording.
A study group call covers a lot in an hour. Four people work through three topics and a past paper question, and by the next morning nobody agrees on what the answer to question 4 was. If your group meets on Google Meet, one of you can record the call in Chrome with Cheap Recorder, split the transcript by topic, and send everyone a set of notes before the exam.
Why record a study group call
In a study group, the person taking notes stops studying. They write while the others argue, and the notes miss the one explanation that finally made sense.
A recording fixes that. Everyone can join in, and one person turns the transcript into notes afterwards. The notes then hold the group's own words, the way a classmate explained it, which is often clearer than the textbook.
This post is about the notes, not the recording. The aim is a short document split by topic that the whole group can read in five minutes, with the recording kept on one computer in case you need to check a line.
Agree on it before the call
Tell the group you want to record, and why, before the call starts. The law on recording calls differs from place to place, and some places need everyone to agree, so follow the rules where you and your classmates are. If your school or college has its own rules about recording, follow those too.
Agree on two more things while you are at it:
- Who records. One person, the same one each week if you can. Two recordings of the same call means two transcripts to merge.
- What gets shared. Most groups only need the notes, or the transcript as text. Keeping the audio on the recorder's computer means nobody's voice gets passed around.
Then say it out loud at the start of the recording: "I'm recording this for the notes, everyone OK?" The answer is in the file.
Set up the recorder next to the Meet tab
You need Google Chrome on a Mac, Windows or Linux computer, with the Meet call open in a Chrome tab. The Free plan covers every step below, and the Google Meet guide has the same steps in more detail.
- Open the Meet call, or its waiting screen, in a Chrome tab. Open Cheap Recorder in another tab and sign in.
- Under Where to save, press Choose folder… and pick a folder for the course. Each recording gets its own folder inside it, named with the date, the time and the recording's name.
- In the Call audio tile, press Pick the call tab…, choose the Meet tab and tick Share tab audio (some versions of Chrome say "Also share tab audio"). The tile should show "on" and the tab's name.
- Switch the webcam off and do not pick a screen. The call is then saved as an M4A audio file instead of an MP4, which is all the notes need.
- Open Options and check that Live transcript is ticked (it is by default). In the menu beside it, choose the language the group studies in. Chrome listens for one language per recording, so choose before you start.
- Type a name in Name this recording, such as "Biology study group week 5", and press Start recording. Press Stop and finish when the call ends.
Wear headphones. They stop your classmates' voices coming out of your speakers and back into your microphone.
Before the first recorded session, do a one-minute test call with a friend and play it back. If you can hear yourself but not them, the tab sound was not picked.
Who is speaking: you, and everyone else
The transcript labels each line with the sound source that was loudest when it was spoken. Your lines carry your microphone's name. Everything from the Meet tab carries the label "Meeting".
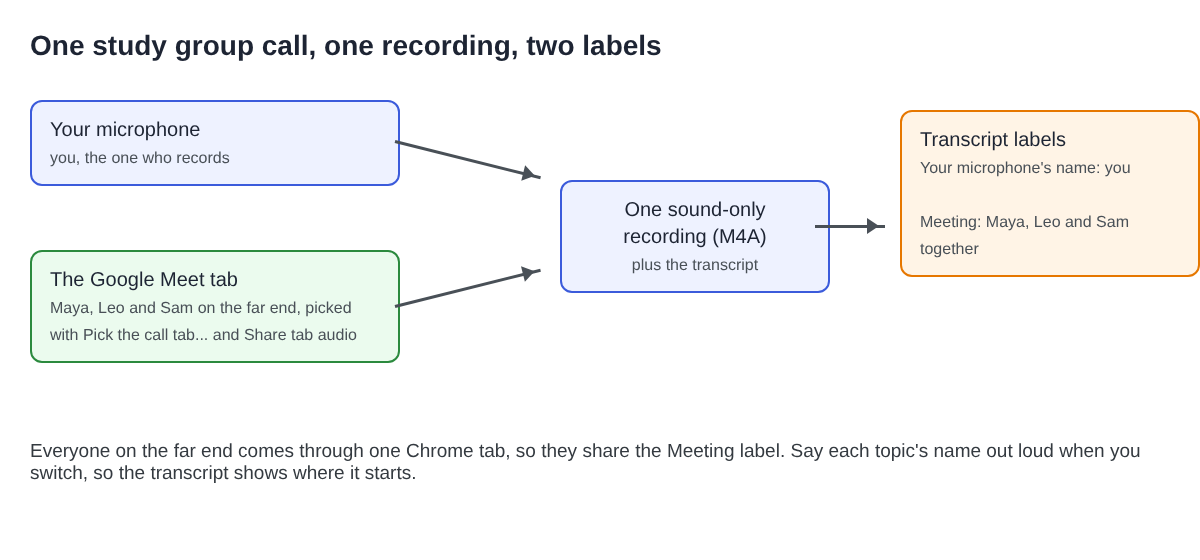
That matters more in a study group than in a one-to-one call. The call's sound comes from one Chrome tab, so everyone on the far end is in the same file, and Maya, Leo and Sam all appear as Meeting. On plans that include speaker detection you can type a real name into each Speaker box and press Save captions, but the Meeting box can only hold one name, so call it "Group".
For study notes this is fine. You need to know what was said about each topic, not who said it. If a name matters, for example who is writing up question 4, have that person say it: "I'll do question 4."
Split the call by topic as you go
A study group call wanders. Notes are only useful if each topic has its own section, so mark the switches while they happen.
Each time the group moves on, do two things:
- Say the topic out loud. "Topic two, photosynthesis." That sentence lands in the transcript under your microphone's name, with its time, and it is easy to search for later.
- Press M, or Add marker. A short note confirms the time. With a normal recording that note is not saved, so jot the time on paper next to the topic name.
Saying it out loud is the part that does the work. Your jotted times are a backup for finding the moment in the player.
If you see "Meeting audio sharing stopped." during the call, the tab share has ended, for example because the Meet tab was closed. From then on your classmates are silent in the recording, though your voice carries on. Picking the tab again does not add it back, so stop, start a new recording, and carry on.
A worked example: from transcript to shared notes
Say your group meets for 90 minutes before a biology exam. You switch topics four times, and each time you say the topic out loud and jot the time.
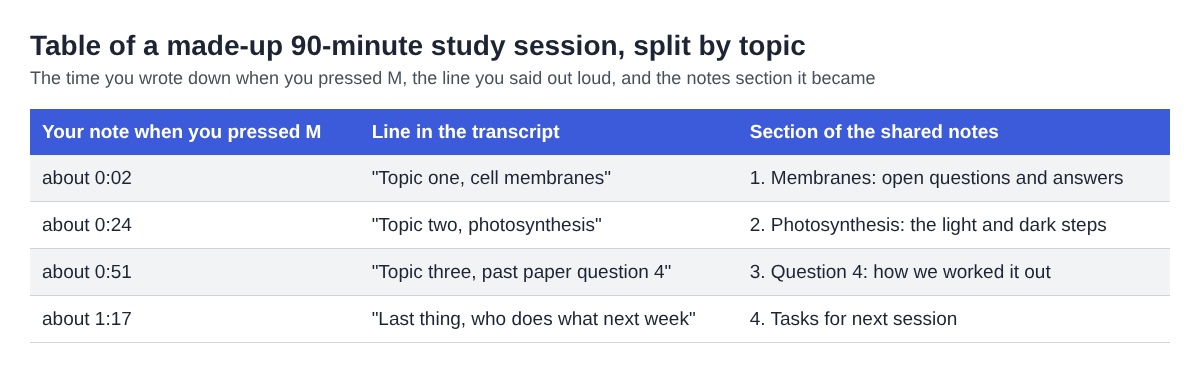
After Stop and finish, the transcript is saved next to the recording and named after it, for example "Biology study group week 5 - transcript.txt". It is plain text with times and speaker names, so it opens in any text editor.
- Open the transcript and search for "Topic". Each hit is the start of a section.
- Copy the lines between two hits into a new document under a heading, such as "2. Photosynthesis".
- Cut each section down to the questions the group asked and the answers it settled on. Three to six lines per topic is plenty.
- End with the last section, "Tasks for next session", and the names people said out loud.
Chrome gives a time for each line, not each word, so the times are close, not exact. That is enough to find a moment in the player when two people remember an answer differently.
Then share the notes in your group chat or shared document. If someone missed the call and wants more detail, the transcript is plain text and easy to paste into an email. The audio stays in your folder.
Plan your minutes too. A 90-minute call each week for four weeks is 6 hours, half of the Free plan's 12. Each plan has a number of recorded minutes a month, and if they run out mid-recording the recording stops, so open your name in the top right to see how many are left.
What leaves your computer
Your classmates may ask, so know the answer. The recording is saved in the folder you chose and is not uploaded, unless you use Convert. While the live transcript is on, Chrome sends the microphone audio to Google to turn it into text. The transcript is only made live, so if Live transcript is off, there is no way to add one afterwards.
The recorder's activity log holds the folder and file names you chose and the names of your microphones. An AI button, if you press it, sends the transcript with its speaker names to Anthropic; nothing is sent unless you press it.
For other kinds of group calls, see the posts on recording a book club discussion and a debate team practice. The live transcript guide explains every file the transcript gives you.
Frequently asked questions
Can the transcript tell my classmates apart?
No. Everyone on the far end of the call comes through the Meet tab, so they all share the Meeting label. Your own lines carry your microphone's name.
Do my markers end up in the transcript?
No. With a normal recording the marker notes are not saved, so say each topic's name out loud and jot the time down; the spoken line is what you search for.
What if my classmates go silent in the recording?
If the recorder shows "Meeting audio sharing stopped.", the tab share has ended and picking the tab again will not add it back. Stop, start a new recording, and carry on.
How many study sessions fit in the Free plan?
The Free plan has 12 hours of recording time, which is eight 90-minute calls. Open your name in the top right of the recorder to see how many minutes are left.
Get started
Before your next study group call, open the recorder in Chrome, pick the Meet tab with its sound, and record a one-minute test with a friend. Start free on Cheap Recorder; no card is needed.
Screen recording that is cheap and easy.
Visit cheaprecorder.com↗