Remote tutoring session on Google Meet: record it and send a recap
Record a one-to-one remote tutoring session on Google Meet in Chrome, mark the moments your student gets stuck, and turn the transcript into a short recap.
A remote tutoring session goes by fast. Your student works through a problem, gets stuck twice, finally gets it, and by the next week neither of you remembers exactly where the trouble was. If you tutor on Google Meet, you can record each session in Chrome with Cheap Recorder, mark the moments your student gets stuck, and send a short recap from the transcript before you close the laptop.
Why record a remote tutoring session
Notes taken during a lesson are thin, because your attention belongs to the student. A recording lets you teach first and write later.
It also helps the student. A recap that quotes their own words ("I always forget to carry the minus sign") is easier to act on than "watch your signs". And when a parent asks how things are going, you can point to what happened in a real session instead of a general feeling.
This post is about one-to-one tutoring, one student on the far end of the call. That setup gives you something group calls do not: two clean labels in the transcript, one for you and one for your student.
Ask first, every time
Tell your student you are recording, and why, before you press anything. The law on recording calls differs from place to place, and some places need everyone on the call to agree, so follow the rules where you and your student are. If your student is a child, ask a parent as well, and follow any rules your tutoring service or school has about recording students.
A good habit is to say it out loud at the start of every recording: "I'm recording this so I can send you a recap, is that OK?" The question and the answer are then in the recording itself.
Set up the recorder for a Meet session
You need Google Chrome on a Mac, Windows or Linux computer, and the Meet call open in a Chrome tab. The Free plan covers every step below, and the Google Meet guide has the same steps with more detail.
- Open the Meet call in a Chrome tab. Open Cheap Recorder in another tab and sign in.
- Under Where to save, press Choose folder… and pick one folder per student. Each recording gets its own folder inside it, named with the date, the time and the recording's name.
- In the Call audio tile, press Pick the call tab…, choose the Meet tab and tick Share tab audio (some versions of Chrome say "Also share tab audio"). The tile should show "on" and the tab's name.
- Switch the webcam off and pick no screen. The session is then saved as an M4A audio file instead of an MP4, which is all a recap needs.
- Open Options and check that Live transcript is ticked (it is by default). In the menu beside it, choose the language you teach in. Chrome listens for one language per recording, so choose before you start.
- Type a name in Name this recording, such as "Algebra week 6 fractions", and press Start recording. Press Stop and finish when the session ends.
Wear headphones. They stop your student's voice coming out of your speakers and back into your microphone, which would put them in the file twice.
Before your first recorded session, the guide suggests a one-minute test call with a friend. Record a minute, play it back, and check you can hear both sides. If the other voice is missing, the tab sound was not picked.
Who is speaking: two labels, one student
The transcript labels each line with the sound source that was loudest when it was spoken. Your voice comes from your microphone, so your lines carry your microphone's name. Everything from the Meet tab carries the label "Meeting". With one student on the call, Meeting means your student.
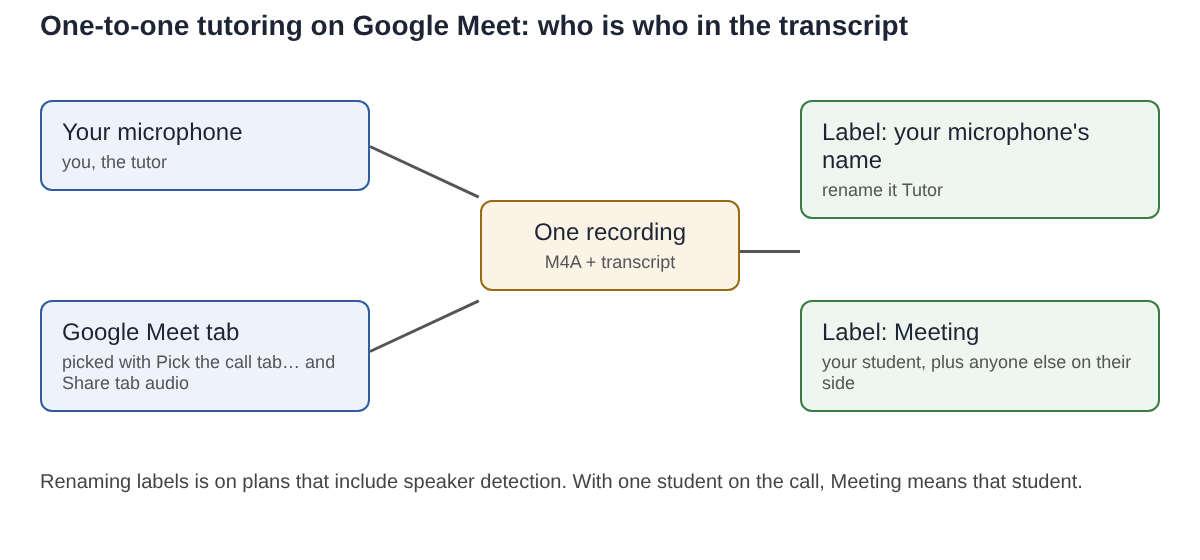
On plans that include speaker detection, open the Speaker boxes after the session, type "Tutor" for your microphone's label and the student's first name for Meeting, and press Save captions.
Two cases break the clean split. If a parent joins the call for the last five minutes, they come through the same Meet tab, so they share the Meeting label with the student. And if you both talk at once, the line goes to whoever was louder. Neither matters much for a recap, but do not rename Meeting to the student's name on a session where someone else spoke from their side.
The call's sound comes from one Chrome tab, so you cannot pull the student onto a track of their own. Everyone on the far end is in the same file.
Mark the moments that matter
Press M, or Add marker, whenever something happens you want to find again. For tutoring, three kinds of moment are worth a marker:
- Stuck: the student stops, guesses, or says "I don't get it".
- Clicked: the moment they explain it back in their own words.
- Homework: when you set the practice for next time.
Pressing M takes a second and does not interrupt the lesson. You do not need to label markers while you teach; the transcript lines around each one tell you which kind it was.
If you see "Meeting audio sharing stopped." during the session, the tab share has ended, for example because the Meet tab was reloaded. From then on your student is silent in the recording. Picking the tab again does not add it back to a running recording, so stop, start a new recording, and carry on.
A worked example: from a 45-minute session to a recap
Say you tutor a student in algebra for 45 minutes on Meet. You press M four times. After Stop and finish, the transcript is saved next to the recording, named after it, as plain text that opens in any text editor. Every line starts with a time measured from the start of the recording.
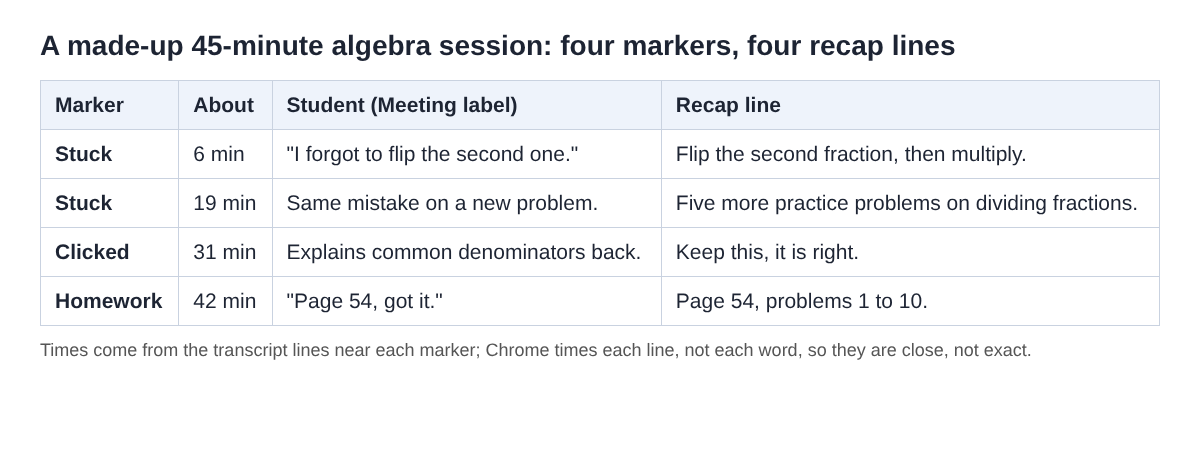
Read the lines under the Meeting label near each marker, and you have the recap almost written:
- At about 6 minutes, stuck on dividing fractions: "I forgot to flip the second one." Recap: flip the second fraction, then multiply.
- At about 19 minutes, the same mistake again. Recap: worth five more practice problems.
- At about 31 minutes, clicked: the student explained common denominators back in their own words. Recap: keep this, it is right.
- At about 42 minutes, homework set. Recap: page 54, problems 1 to 10.
Chrome gives a time for each line, not each word, so the times are close, not exact. That is plenty to find a moment and play it back.
Send the recap as a short message, to the student or to a parent if that is what you agreed. Keep the M4A in the student's folder, so you can play back the first stuck moment at the start of next week's session.
Plan your minutes too. Four students at 45 minutes a week each, over four weeks, comes to 12 hours, which is the Free plan's whole allowance. Each plan has a number of recorded minutes a month, and if they run out mid-recording the recording stops, so open your name in the top right to see how many are left.
What leaves your computer
Families will ask, so know the answer. The recording is saved in the folder you chose and is not uploaded, unless you use Convert. While the live transcript is on, Chrome sends the microphone audio to Google to turn it into text. The transcript is only made live, so if you switch it off, there is no way to add one afterwards.
The recorder's activity log holds the folder and file names you chose and the names of your microphones, so a first name and a subject in a recording's name is safer than a child's full name. An AI button, if you press it, sends the transcript with its speaker names to Anthropic; nothing is sent unless you press it.
If you teach languages, the post on how to record a language lesson and review it afterwards covers the review side in more depth. For the meeting with a parent rather than the student, see the parent-teacher meeting post, and the live transcript guide explains every file the transcript gives you.
Frequently asked questions
Can the transcript tell me and my student apart?
Yes, in a one-to-one session. Your lines carry your microphone's name and your student's lines carry the Meeting label; anyone else who joins from their side shares that label.
What if my student goes silent in the recording?
If the recorder shows "Meeting audio sharing stopped.", the tab share has ended and picking the tab again will not add it back. Stop, start a new recording, and carry on.
Can I add a transcript to a session I recorded without one?
No. The transcript is only made live while you record, so check that Live transcript is ticked before you press Start recording.
How many sessions fit in the Free plan?
The Free plan has 12 hours of recording time, which is sixteen 45-minute sessions. Open your name in the top right of the recorder to see how many minutes are left.
Get started
Before your next remote tutoring session, open the recorder in Chrome, pick the Meet tab with its sound, and record a one-minute test with a friend. Start free on Cheap Recorder; no card is needed.
Screen recording that is cheap and easy.
Visit cheaprecorder.com↗