
Record a product walkthrough for a new teammate
Record a product walkthrough for a new teammate in Chrome: five short parts, a marker at each start, a 30-second test first, and how to send it so they can find any part.
A live tour of your product gets forgotten by Friday. A recorded product walkthrough does not: the new person can pause it, replay the confusing part and watch it again in week three. You can record one in Chrome in about the time the tour takes, with no editing software.
Cheap Recorder runs in Google Chrome on macOS, Windows and Linux. It saves your screen and your voice as one MP4 on your own computer, with a transcript. This post covers what to put in the tour, how to set up your screen, the exact steps, and how to send the file so a new teammate can find the part they need.
Why a recording beats a live tour
In a live tour, the new person listens, takes notes and watches the screen all at once. They may also not want to interrupt to ask what a button does.
A recording lets them go at their own pace, and you record it once for every future hire. It is the cheapest way to stop giving the same tour every few months. If you already record a regular update for your team, the habit is the same, and the weekly team update post shows how to set that one up.
Plan the product walkthrough in five short parts
Do not try to show every screen. A new teammate needs a map first and details later. Five parts cover most tours:
- What it is for. One or two sentences on who uses the product and why.
- One normal session. Follow one customer, or one ticket, from start to finish.
- The screens you will use daily. Only the ones this person touches in their first weeks.
- Two mistakes. What goes wrong most often and how you fix it.
- Who to ask. Where help lives, in one sentence.
Write one line per part and the first sentence you will say. The first sentence is the one people stumble on; the rest is easier with the screen in front of you. Leave rare settings and old features out. If one deserves its own video, say so and record it separately.
Set up your screen so nothing private slips in
Whatever is on the shared screen ends up in the file. Before you press record:
- Close the tabs and apps you do not need, and silence notifications.
- Open the product with test data, not real customer data.
- Share one browser tab or one window, not the whole screen. That keeps other tabs, apps and private things out of the recording.
- Use a headset or a desk microphone close to your mouth. The transcript is made from what Chrome hears on your microphone, so a close microphone gives better text than a laptop microphone in a noisy room.
If the product plays a sound, such as a chime, share the tab and tick the tab-audio box in Chrome's sharing window. A shared window gives no sound. The no-sound guide covers the usual causes if something goes silent.
If a colleague's voice or a real customer's name will appear, tell them first. Anyone being recorded should know.
Record a product walkthrough in Cheap Recorder, step by step
The Free plan covers all of this, and it needs no card.
- Open the recorder in Chrome and allow the microphone, and the camera if you want to be on screen.
- Under Where to save, press Choose folder... and pick a folder. Chrome asks whether the page may edit files in it; allow it. Until you do, Start recording stays greyed out and the note beside it says to choose a folder first.
- In Name this recording, type a name with a number, such as
Onboarding 01 Help desk tour. The name is used for the file and its folder, so numbers keep a series in order. - Under What to capture, pick the tab or window and press Share in Chrome's box.
- Decide on your face. Record my webcam adds a small camera view (picture in picture, bottom right, is the default); switch it off for a screen-only video.
- Under Options, check that Live transcript is ticked. If you leave it off, a transcript cannot be added to that recording afterwards.
- Record 30 seconds, stop, and play it back. This catches a wrong microphone or a muted tab before it costs you ten minutes.
- Record the real one. Press M or Add marker at the start of each part; a short note confirms the time.
- Press Stop and finish. Chrome's own Stop sharing bar also ends the recording, but Stop and finish is the one to use.
Markers are saved to files only when Also save every source separately is ticked before you start. With the default single MP4 the marker notes show while you record but are not saved, so write the times down. The transcript also gives you times to search later.
A worked example: a help desk tour for a new support hire
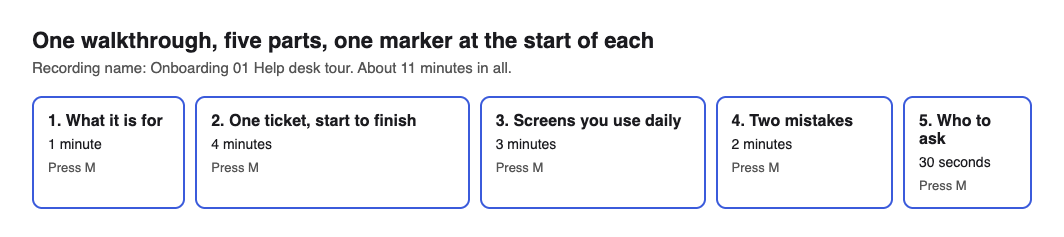
Say a new support teammate starts on Monday and your team uses an internal help desk tool. You write five lines: what the tool is for (1 minute), one ticket from arrival to closed (4), the three screens used daily (3), two common mistakes (2), who to ask (30 seconds).
You name the recording Onboarding 01 Help desk tour and share the help desk tab with test tickets in it. You record a 30-second test, hear that your voice is fine, and then record the real one in a single pass, pressing M at the start of each part. If you trip over a sentence, you say it again and keep going.
The recorder writes to a folder named Onboarding 01 Help desk tour plus the date and time it began, with an MP4 and a transcript text file. The tour is about 11 minutes. The Free plan has 12 hours a month, which is 720 minutes, so this uses under 2 percent of it. Next week you record Onboarding 02 Tools setup and the two sort together.
Send it so they can find the part they need
The recording is already on your disk, so nothing needs uploading before you share it. Your options:
- Send the MP4. It plays almost anywhere; put it in the shared drive your team already uses.
- Paste the transcript.
Onboarding 01 Help desk tour - transcript.txtis plain text with times. Put it on a wiki page beside the video so people can search it. - Download captions. Captions .srt on the card is made in the page and is not saved in the folder, so download it while the recorder page is open.
- Send a page. On Creator and up, tick Also save every source separately before recording and the folder gets
publish.html: a player, one chapter per marker and the transcript with times. Send the whole recording folder, not just the page. The publish page guide has the steps.
The recording never leaves your computer unless you use Convert or Download MP3, which send it to the server and delete it there when done. The convert guide covers both. While the live transcript is on, Chrome sends your microphone audio to Google to make the text.
Keep it up to date
When a screen changes, record just that part again and give it the next number. Keep the old video until the new one is in place. There is no timeline editor, so short videos that each do one job are far easier to replace than one long one. The course and tutorial guide goes further on numbering a series and marking sections.
If you are weighing what a recorder costs over the years, the five year cost post has the numbers.
Frequently asked questions
How long should a product walkthrough be?
Keep each video to one job. Five parts of a few minutes each is plenty; if a topic needs more, record a second video and number the two so they stay in order.
Do I have to show my face?
No. Switch off Record my webcam for a screen-only recording, or leave it on for a small camera view in the corner.
Can I add a transcript after I record?
No. If Live transcript was off, a transcript cannot be added to that recording afterwards. It is ticked by default under Options, so check it before you start.
What happens if my minutes run out mid-tour?
The recording stops. Open your name in the top right to see how many minutes are left before a long recording.
Does it work offline?
No. Your plan comes from the server, so starting a recording needs an internet connection. The finished MP4 plays anywhere without one.
Get started
Write your five lines, close the extra tabs and record a 30-second test. Then record the tour. Start on the free plan, no card needed, and the files stay on your own computer.