
Podcast intro and outro: record each as a separate take
Record your podcast intro and outro as separate takes in Chrome: two short scripts, a quick microphone test, clear names and the sound-only M4A you get.
If you make a podcast, your podcast intro and outro are the two pieces that barely change from week to week. You can record each one as its own take in Chrome, give it a plain name and reuse it for a season. This post shows the scripts, the test, the settings and the names, step by step.
Why a podcast intro and outro work better as their own takes
An intro says who you are and what the show is. An outro says thanks and where to find more. Neither needs a guest, a long conversation or a mood from the middle of an episode.
Recorded on their own, they sound fresh and clean. Each one sits in its own folder, with its own name, so you never hunt through a long file for the first twenty seconds. If you change the wording next season, you replace one file and leave the episodes alone.
What you need before you record
Cheap Recorder runs in Google Chrome on macOS, Windows and Linux, and saves recordings on your own computer. The Free plan covers everything below: recording, the live transcript and captions, and 12 hours of recording a month, with no card needed.
- Google Chrome, with the recorder open at cheaprecorder.com/app.
- A microphone. A wired or USB one is the safe choice. Avoid a Bluetooth headset as your microphone, because it drops to a low-quality mode when used that way.
- An internet connection. There is no offline mode, because the recorder asks the server for your plan before it starts.
- A folder on your computer with some free space.
Under Where to save, press Choose folder.... Chrome opens its folder picker, then asks whether the page may edit files in that folder. Allow it. Until you do, the note beside the button says choose a folder first and Start recording stays greyed out.
Write two short scripts
Keep both short enough to say in one breath. A short script is easier to repeat well, and easier to redo when you trip.
Here is a made-up example for a show called Small Shop Talk:
Intro: "Welcome to Small Shop Talk. I'm Dana, and each week I talk to one person who runs a small business. Let's get into it."
Outro: "That's the show. If it helped, tell one friend who runs a shop. New episodes come out every Tuesday. See you next week."
Read each one aloud twice before you record. Underline any word you stumble on and swap it for an easier one.
Test your microphone for 30 seconds
A short test saves you from redoing both takes.
- Open Change or add microphones and tick the microphone you will speak into. Press Rescan if you just plugged it in.
- Switch off Record my webcam and do not pick a screen. That makes a sound-only recording, saved as an M4A file.
- Press Start recording, say your intro, then press Stop and finish.
- Play it back from the card on the page, with headphones on.
While you speak, a level bar moves next to each ticked microphone. If it stays flat, the recorder is not hearing that microphone; pick another one in the list. If the tile says no microphone found, Chrome cannot see one, so plug it in and press Rescan. For a longer checklist, read test your microphone before a long screen recording in Chrome, or the guide to no sound in a screen recording.
Then look at Record the microphone untouched under Options. It turns off echo, noise and volume correction. It suits a studio microphone in a quiet room. On a laptop microphone or in a noisy room, leave it unticked. If your voice is very quiet or pumps up and down on a studio microphone, tick it.
Record the intro as its own take
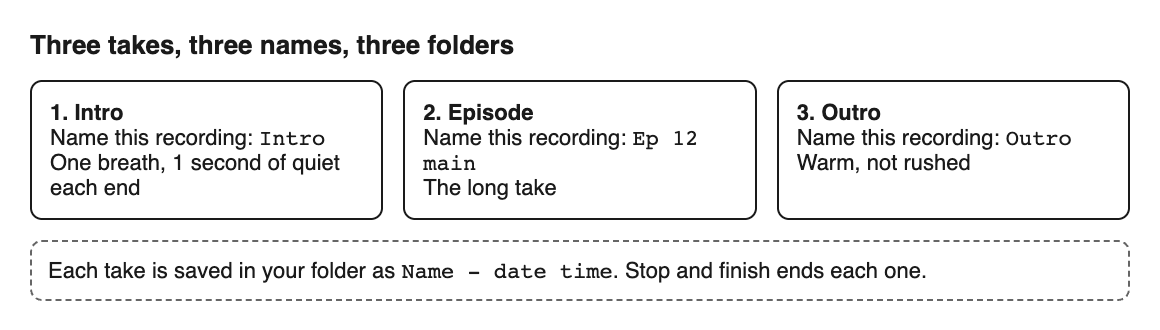
Type Intro into Name this recording. The name becomes the file name and the folder name, so keep it plain.
Check the transcript under Options. Live transcript is ticked by default, with 25 languages to choose from, picked before you start. The language menu goes back to its default each time the page opens, so look at it every time. If you leave the transcript off, you cannot add one afterwards. While it is on, Chrome sends your microphone audio to Google to turn it into text, so untick it if that is not acceptable for your show.
- Wait until the note beside the button reads ready to record.
- Press Start recording.
- Leave a second of silence, then say your intro.
- Leave another second of silence, then press Stop and finish.
Use the Stop and finish button, not Chrome's own Stop sharing bar. The bar also finishes the recording, but the recorder's own button is the one to rely on.
The take appears on the page with a player, and it is already saved in your folder. Play it back. If you stumbled, record it again with the same name. Two recordings with the same name in the same minute get (2) on the end, so nothing is overwritten.
Record the outro as its own take
Do the same again with the name Outro. The recorder keeps your microphone choice in this browser, so the second take starts with the setup you just tested. You only change the name.
Say the outro the way you would end a real show: warm, not rushed. Leave a second of quiet before you press Stop and finish.
If you later add a remote guest, the setup changes. Press Pick the call tab... in the Call audio tile, and tick Also save every source separately to get the far end of the call as its own file. Everyone on the far end shares one track, though. The podcast separate tracks guide has the steps, and it is a different job from a solo intro.
Name and keep your takes so you can reuse them
Each recording gets its own folder. The folder is named with what you typed, then the date and time the recording began on your clock, for example Intro - 2026-10-17 09.30. Inside is the recording, here Intro.m4a, and a text file with the transcript when the transcript caught speech.
- Number your episodes. A name like
Ep 12 mainsorts neatly next toIntroandOutro. - Keep the good intro somewhere safe. Recorded files are ordinary files, so you can move or rename them. Finish any download or conversion from the card first, because the card reads the file from where it was saved.
- Sort by name or by date. Name groups a recording's takes together; date shows everything in the order you made it.
- Skip odd characters. The characters
/ \ : * ? " < > |are left out of names, and names are cut at 60 characters.
Need another format? A sound-only take offers Download M4A, which hands over the file with no upload. For an MP3 or WAV, use Download MP3 or open More formats... and press Convert. Both send the file to the Cheap Recorder server, which deletes its copy when it finishes, and your original is not changed. MP3 and M4A come out at 192 kbps, and WAV is 16-bit at 48 kHz. The convert recording formats guide has the steps, and where recordings are saved explains the folders.
If you also record a voiceover for a video version of your show, voiceover for a screen recording: record it in one take uses the same habits.
Frequently asked questions
Can I record the intro and outro in one sitting?
Yes. Record the intro, press Stop and finish, change the name to Outro and record again. Each take gets its own folder.
What file do I get for a sound-only take?
An M4A audio file with AAC sound. You get it when Record my webcam is off and no screen is picked.
Do I need a transcript for an intro?
No. It is ticked by default and included on the Free plan, but you can untick Live transcript before you press Start recording if you do not want Chrome to send microphone audio to Google.
Can I fix a bad take afterwards?
The simple way is to record it again under the same name and keep the better one.
Does it work without internet?
No. Starting a recording needs a connection, because your plan comes from the server.
Get started
Open the recorder, choose a folder and record your intro today. The Free plan needs no card, and your recordings stay on your own computer. Start recording for free.