Canva design tutorial: record your screen and voice in Chrome
Record a Canva design tutorial in Chrome: share only the Canva tab, say each shortcut out loud, and keep one MP4 with a timed transcript on your disk.
To record a Canva design tutorial, open your design in a Google Chrome tab, share only that tab with a screen recorder, and talk through each step into your microphone. With Cheap Recorder that gives you one MP4 and a timed transcript in a folder on your own computer, and there is nothing to install.
This post does not teach Canva. The design and the steps are yours. It covers the recording: which screen pick to use and why, how to keep small details readable, and how to get written steps out of what you say.
Why a browser tab is the right pick for a Canva design tutorial
Under What to capture, Cheap Recorder offers Whole screen, A window or A browser tab. Chrome then opens its own sharing box, and you pick there and press Share. The three picks film different things, and they treat sound differently.
- Whole screen films everything on it. The course guide says it plainly: anything on the shared screen ends up in the file. On a Mac it also brings no sound.
- A window films one window. Chrome does not hand over a window's sound.
- A browser tab films the one tab you pick. It brings the page's sound too, but only when you tick the tab-audio option in Chrome's sharing box.
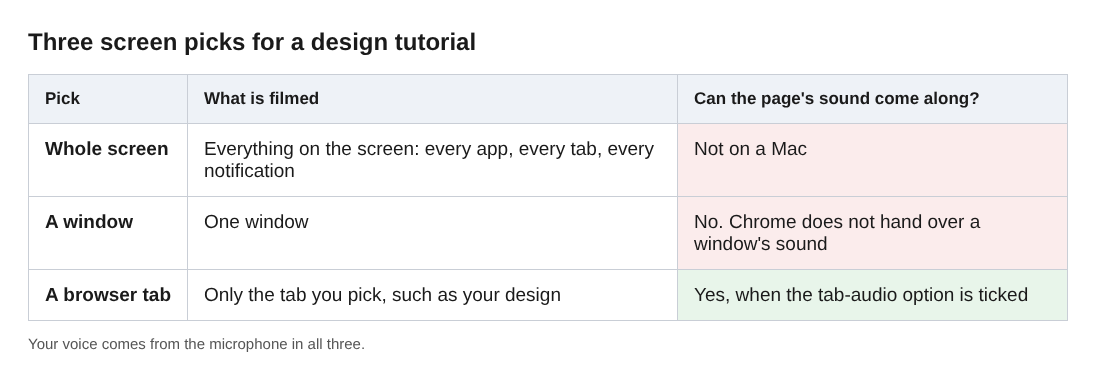
A design open in a Chrome tab fits the third pick. Your email, your other designs and your notifications stay out of the picture because they are not in that tab. Our Chrome tab demo post goes through the pick step by step.
The sound rule matters only if your design makes sound, such as a video design with music. Then tick the tab-audio option and leave the tab open for the whole recording. For a still design, your microphone is the only sound you need.
Make the canvas readable before you record
A design tutorial fails in a way a spreadsheet tutorial does not: the viewer cannot see the detail. Fit a whole poster into the frame and its small text shrinks with it. So zoom in on the part you are changing, and zoom back out to show the result.
Canva's Help Center page "Canva keyboard shortcuts", opened for this post, lists the keys on a Mac: Command and + to zoom in, Command and - to zoom out, and Option, Command and 0 to zoom to fit. The same page has a Windows column. It also lists Shift and R to show rulers and guides, which helps when the lesson is about lining things up.
Do not trust the keys blind. Press them once with the tab shared and watch the Preview box in the recorder. The screen and webcam guide says the preview is the recording: what you see there is exactly what the file will hold.
Your camera is the other thing that hides detail. With Record my webcam on, your face sits in a box over the screen, bottom right by default. Drag it off the part of the canvas you are working on, or shrink it with the Size slider, which goes from 12% to 50% of the picture's width. The Layout menu also has Screen only. Open your name in the top right and read What you can do on this plan to see which layouts are switched on for you.
Say every shortcut and value out loud
A tab recording shows what a shortcut did, not which keys you pressed. The viewer sees a shape jump into line and has no idea how. So say it: "Command and D to duplicate." Say values too: the font size, the colour code, the spacing number.
Speaking has a second payoff. The live transcript is ticked by default and is part of the Free plan. It uses Chrome's own speech recognition, so while it is on, Chrome sends your microphone audio to Google to turn it into text, and you need to be online. When you stop, the transcript is saved beside the MP4 as plain text with the time of each line.
That file is the first draft of your written steps. Anything you only clicked is missing from it. Anything you said is there with a time next to it.
Two limits are worth knowing. Chrome reports a time for each line, not each word, so times are close, not exact. And Chrome listens for one language per recording. No page we read says how well it hears font names or colour codes, so check every name and number against the video before you publish the steps.
Split the tutorial into numbered recordings
Cheap Recorder does not claim a timeline editor. A mistake in minute nine of a single ten-minute take means recording all ten minutes again. Short recordings shrink that cost to one part.
Before each part, type a numbered name into Name this recording, such as Canva 02 Text and colour. The course and tutorial guide says the name is used for the file and its folder, so the numbers keep the parts in order. Each recording gets its own folder, named with what you typed, then the date and time.
Start the session with a 30-second test and play it back. It catches a wrong microphone before you lose a whole part. And if you press M to mark a moment, write the time down. With the default single MP4, marker notes show while you record but are not saved.
A worked example: three parts on the Free plan
Say you teach how to build a square social post. You plan three parts: the layout (3 minutes), text and colour (5 minutes), and lining things up with rulers and guides (2 minutes). That is 10 minutes of finished video.
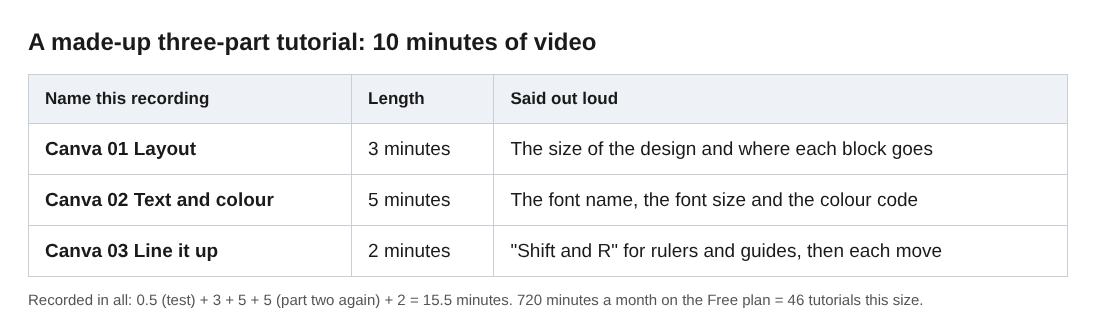
Now count what you really record. The test is half a minute. You fluff the colour code in part two and record that part again, which adds 5 minutes. The total is 15.5 minutes of recording for 10 minutes of tutorial.
The Free plan card shows 12 hours of recording time, which is 720 minutes a month. At 15.5 minutes each, that is room for 46 tutorials of this size. Had you recorded one 10-minute take and repeated all of it, the same slip would cost 20.5 minutes, and the month would hold 35. The split is worth 11 tutorials a month.
Afterwards, open the three transcript files and copy the lines with a shortcut or a value into a numbered list. Our post on turning a transcript into step-by-step instructions covers that job.
Limits, and what is still unsettled
- Canva lists a recorder of its own. Its menu shows an online video recorder. This post does not compare the two. What you get here is an MP4 and a timed transcript as ordinary files on your disk.
- The desktop app has no tab. Canva's shortcuts page has a section for its desktop app. If you design there, pick A window instead, and remember that a window share carries no sound.
- The transcript leaves your computer as sound. The recording is not uploaded, but with Live transcript on, your microphone audio goes to Google. If you narrate a client's unreleased campaign, untick Live transcript first. It cannot be added afterwards.
- Chrome's Stop sharing bar ends the take. Use Stop and finish instead.
- Unsettled: the edges of a tab share. The guides do not say what Chrome draws around a shared tab, or what the recording shows if a click opens a new tab. Check both in your test.
- Unsettled: deleted takes. The guides say a recording stops when the month's minutes run out. They do not say a deleted take gives its minutes back, so the example above counts every minute.
Frequently asked questions
Can I record a Canva tutorial without showing my face?
Yes. Switch off Record my webcam before you start, and the recording holds the Canva tab and your voice only.
Will music in my Canva video design be recorded?
Only if you choose A browser tab and tick the tab-audio option in Chrome's sharing box. A window share has no sound, and on a Mac a whole-screen share has none either.
Is my design uploaded anywhere?
No. The file is saved straight into the folder you chose. The exceptions are Convert and Download MP3, which send the file to the Cheap Recorder server and delete it when done, and the live transcript, which sends microphone audio to Google. The privacy page adds that the activity log holds the folder and file names you chose.
How long can a tutorial be on the Free plan?
The Free plan card shows 12 hours of recording time. If your minutes run out during a recording, it stops, so open your name in the top right to see how many are left.
Get started
Open your design in one Chrome tab and the recorder in another. Choose a folder, pick A browser tab, record a 30-second test, then record part one. The Free plan needs no card. Create a free account and record your first Canva design tutorial today.
Screen recording that is cheap and easy.
Visit cheaprecorder.com↗